Unity GUI has a great drag and drop interface for calling public functions from your code when certain events are triggered. You can see this when using a UGUI Button script, it has an interface for calling your functions when the button is clicked. I was looking into a way to replicate this kind of drag and drop interface for my own projects and found that Unity has this functionality built in. There’s no need for custom UnityEditor scripts. I figured this out while digging through the source code for the Unity UI system.

An Example of UGUI Button OnClick events
The beauty of having this drag and drop functionality is that it makes it easier to modify the logic of your project without having to dig into code to make changes. By partnering this with a set of specialized components, you can easily create a system for modifying aspects of your project without having to dig into code.
It’s actually quite easy to setup something like this for your own project. This is great for UI Events but also for game events (collecting items, level complete, etc.). To accomplish this all you need is to make use of the UnityEvent class. Just to be clear, these aren’t the same as the standard C# Event system.
Here’s a simple example of how it works. First I setup a new scene with a CustomEvent gameobject and a DemoScript gameobject. The CustomEvent object will have the interface to setting up events to be triggered. The DemoScript object has a script with the public functions that will be called from the CustomEvent gameobject.

I created a CustomEvent class to drop onto the CustomEvent gameobject. This contains the code for setting up the UnityEvents. Here’s what it looks like:
1 2 3 4 5 6 7 8 9 10 11 12 13 14 15 16 17 18 19 | using UnityEngine; using System.Collections; using System; using UnityEngine.Events;</p> public class CustomEvent : MonoBehaviour { [Serializable] private class TestEvent : UnityEvent { } [SerializeField] private TestEvent SelectEvent = new TestEvent(); [SerializeField] private TestEvent LevelCompleteEvent = new TestEvent(); [SerializeField] private TestEvent PowerUpEvent = new TestEvent(); } |
Notice that you’ll need to import the UnityEngine.Events as well as the System namespace (for serialization). First, you’ll need to create a type for your event. In this example I gave them the type of “TestEvent“. Next, you’ll need to create a variable for each event that you want to trigger. For this example, I used the names “SelectEvent“, “LevelCompleteEvent“, and “PowerUpEvent“.

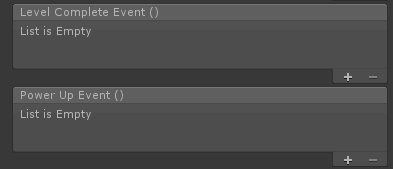
Setting up the events automatically generates this interface within Unity.
Next I’ll setup the DemoScript class and drop that onto the DemoScript gameobject. Here’s what that looks like:
1 2 3 4 5 6 7 8 9 10 11 12 13 14 15 16 17 18 19 20 21 22 23 24 25 26 27 28 29 30 31 32 33 34 35 36 37 38 39 40 41 42 43 | using UnityEngine; using System.Collections; public class DemoScript : MonoBehaviour {</p> // FUNCTION EXAMPLES public void CallFunctionExample() { Debug.Log("CallFunctionExample"); } public void CallBoolean( bool value ) { Debug.Log("CallBoolean : " + value ); } public void CallInt(int value) { Debug.Log("CallInt : " + value); } public void CallFloat(float value) { Debug.Log("CallFloat : " + value); } public void CallString(string value) { Debug.Log("CallString : " + value); } // these types don't work public void CallVector(Vector3 value) { Debug.Log("CallVector : " + value); } public void CallColor(Color value) { Debug.Log("CallColor : " + value); } } |
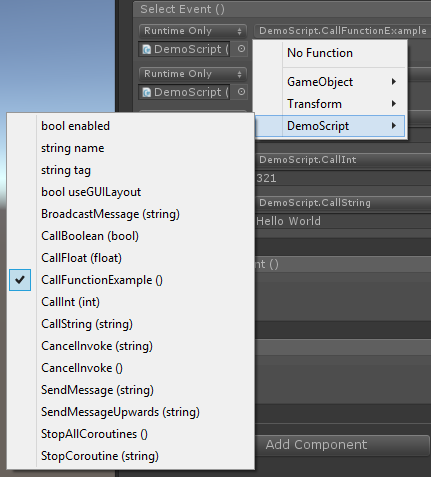
From there, go back to your CustomEvent gameobjects, and hit the “+” icon for a blank slot to drop your DemoScript object into. Once you drop your object on there, the function dropdown will allow you to select a public function on any component of the gameobject.

An example of the event dropdown.
You may notice that there are some types of functions that don’t show up. I believe the main reason is just that the interface isn’t compatible with certain types of function parameters. From my understanding, it works with these common types:
- No parameter
- Boolean
- Float
- Integer
- String
I’ve managed to get around it not supporting types like Vector3 by using another public variable in the targeted object’s scripts that can hold a reference to a targeted position. In the case of using a Color as a parameter, I’ll just refer instead to an integer index of a Color List or Array.
Here’s an example I setup for this demonstration:

Event calls to functions with different parameter types.
Now that the events are setup, you need to Invoke them. I added a simple function to check for a click in the CustomEvent class’s update loop to demonstrate how this works.
1 2 3 4 5 6 7 8 9 10 11 12 13 14 | void Update() { InputCheck(); } void InputCheck() { if ( Input.GetMouseButtonDown(0) ) { if (SelectEvent != null) SelectEvent.Invoke();</p> if (LevelCompleteEvent != null) LevelCompleteEvent.Invoke(); if (PowerUpEvent != null) PowerUpEvent.Invoke(); } } |
So when clicking, you should see something like this in the console:

Debug.Log() calls triggered by a click.
Similar to standard Events, remember to check if the event is null before making a call to it. You don’t want it to throw an error if there’s nothing assigned to the event.
One downside to this is that if you setup a bunch of events in your project and you end up wanting to change the type of event for some reason down the line, you could possibly lose all of these connections. It can be frustrating and tedious to re-set all of those connections.
And that’s it! You can download the complete example scripts below. Let me know if you’ve got any issues, I’ll see if I can offer some clarification.
Peace!
Links:
- Download the complete: CustomEvent.cs , DemoScript.cs
- Download Unity UI Source code
- UnityEvent documentation


