


The Spell Caster

To create the illusion of the user’s photo and name being in the video we developed a sort of realtime compositing system. This isn’t too unbelievably different from something that you’ve probably seen in Flash before but that didn’t make it any less difficult. The goal was to make this seamless with the live action video and visual fx, also handled at Wildlife. With this project I got up close and personal with the quirks and limitations of HTML video — especially with regards to cross platform and cross browsers compatibility.
In Javascript, I developed a system that basically functions as a custom video player. It generates a playlist based on the user’s selection, with certain videos being tied to tracking data that’ll draw the user’s photo and name into the scene as a texture.
Here’s my explanation for how it all works.
Layers

- Transparent overlay canvas
- three.js canvas
- HTML video
- BG canvas
This is the structure of the visual elements that I used for the project. It doubt that it’s the most efficient but it was the most effective for me in this project. I’ll try to explain the reasons why I ended up with something like this.
Each of these is a browser DOM element and they’re stacked on top of eachother like layers. At the bottom is a BG layer that I used to try to hide gaps between videos where the screen would flicker black for a moment as the new video starts. Above the BG is the video, which is a non-fancy standard HTML video object. Above that is a three.js canvas that displays the user’s avatar and name on textured objects — attempting to sync it with the video as accurately as possible. Above that is another canvas that’s drawing a frame sequence that’s attempting to overlay areas where the three.js elements should appear behind objects. Yeah, I know this is ghetto but it worked for the most part! haha!
To save an extra draw to the canvas, I attempted to combine the three.js and overlay layers into one canvas but I didn’t get far with it. I ran into an issue where I succeeded in drawing the overlay and three.js layers together, but the overlay was turning out mirrored because of the way three.js calculates things. It didn’t seem to run significantly faster so I just dropped it because my time was limited. And seeing how either way it’s still drawing the whole frame to the canvas I don’t think it would’ve been any faster in the end, maybe just a bit more resource friendly.
three.js
And if you think about it further, you’ll realize it also opens the door for the future possibility of implementing 3d tracking with animated camera movement and whatnot.
Think about it… 😉
Tracking in After Effects
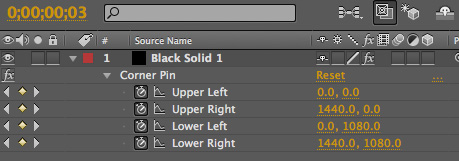
For the After Effects script, I took one I found online that exported keyframe data into an XML format and modified it to write out a JSON format. I also tweaked it to change the way I stored corner point positions in separate objects, and abbreviated certain property names.
Here are some examples of properties that were tracked:
- Position
- Rotation
- Corner Pin (Upper Left, Upper Right, Lower Left, Lower Right)
- Opacity (just used to turn objects on and off)
After I got some data, I recreated the scene in an three.js environment with an orthographic perspective in this case.
JSON Format
The JSON was formatted something like this:
1 2 3 4 5 6 7 8 9 | { "trackData": [ { "key" : { "frame": 0, "ul": {"x": -100, "y": 100}, "ur": {"x": 100, "y": 100}, "ll": {"x": -100, "y": -100}, "lr": {"x": 100, "y": -100}, "pos": {"x": 1, "y": 2, "z": 3} }}, { "key" : { "frame": 1, "ul": {"x": -100, "y": 100}, "ur": {"x": 100, "y": 100}, "ll": {"x": -100, "y": -100}, "lr": {"x": 100, "y": -100}, "pos": {"x": 1, "y": 2, "z": 3} }}, { "key" : { "frame": 2, "ul": {"x": -100, "y": 100}, "ur": {"x": 100, "y": 100}, "ll": {"x": -100, "y": -100}, "lr": {"x": 100, "y": -100}, "pos": {"x": 1, "y": 2, "z": 3} }}, { "key" : { "frame": 3, "ul": {"x": -100, "y": 100}, "ur": {"x": 100, "y": 100}, "ll": {"x": -100, "y": -100}, "lr": {"x": 100, "y": -100}, "pos": {"x": 1, "y": 2, "z": 3} }} ] } |
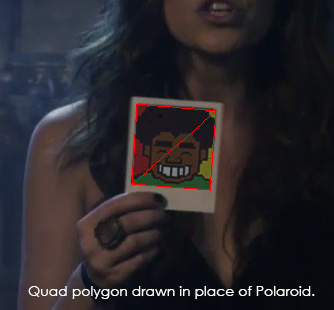
The program would then estimate the current frame of the video based on the video’s time. Then it would grab the position tracking data and draw the quad mesh in that place.
Name Writing
To write the user’s name onto the bottle I created a procedural animation. It needed to be something generated on the fly because it was unique for each user. To create this I generated a frame sequence of the transition. I first attempted to do the easiest name drawing effect that I could do, and I ended up sticking with that one to the end.
After thinking about the text capabilities of canvas I thought about using the line stroke option to create a mask for the text. I imagined that with a script-like font it could be convincing enough to seem like it was handwritten. It sounded like a universal enough method that wouldn’t require a lot of tweaking for a variety of different names. It seemed like a light enough solution to run realtime so I gave it a shot.
Initially I was trying to generate the animation on the fly while it was being composited into the scene but this turned out to be too heavy because of the masking function. As far as I could tell, there’s no built-in masking function in HTML Canvas so I used a function that tested pixel by pixel. I first tried the globalCompositeOperation but there didn’t seem to be one the worked how I was attempting to generate the mask because I didn’t have transparent pixels for the area I wanted to remove. So when the application first starts, it generates the full sequence in the background.

An example of how I generated the name masks
In the image above, the blue name would be the full name and the red would be the masking. I then stored each of these canvas frames in an array and updated the texture in the fly while being composited.
The name draws onto the bottle and it also draws off. For the draw off, I used the same frame sequence but played the frames backwards. I did this not only because it was easier (quick & dirty mah ninja), but to save memory since this thing had to work on iPad.
You can view an example of this in action here:
http://blog.sokay.net/stuff/namedraw/
60fps
So I was amazed that this thing even worked in the end. It was this crazy pipeline I thought up on the fly and when the finished assets started coming in it started to look awesome. The biggest challenge towards the end was trying to keep this thing running 60fps. Since the goal was for the effect to be absolutely seamless, the biggest weakness was that this thing sorta fell apart if it wasn’t running at a full 60fps in browser. On a slower machine, or with computation intense stuff running in the background the experience is lacking.
The problem is that the application will start lagging behind the video. The browser’s priority is to make sure the video and audio play uninterrupted, smoothly as possible. When the code gets slow, usually the video will keep playing fine. But as I’m basing the frames that I’m drawing on the video based on the video time, when that starts lagging behind the composited stuff would lose sync.
As you may know, the common way to run a Javascript code loop is with requestAnimationFrame(). The browser will attempt to call this function as fast as possible in order try to reach a framerate of 60fps. I was bummed to discover that there was no way change the target framerate. I attempted some methods to delay calls to simulate a 30fps or whatever but they didn’t seem to have any impact so I dropped them.
I tried a frameskip method, which tried to estimate how many frames ahead the composited stuff should skip ahead to try to match where the video was but the results were mixed. Sometimes it helped, but most of the time it just looked way off. So I cut that out.
In the end I’ve determined it performs fairly well. I developed it on my Macbook which is like a good 4 years old and it works pretty decently in Firefox. While in Chrome it’s usually spot on.
In Conclusion
There were a lot of smaller, and sometimes unexpected, challenges in this project but I’ll try to end it here. To load the Facebook avatar images and use them as textures required a PHP proxy script which makes the browser believe it’s coming from the same domain (cross-domain issues). Then the image needed color correction, blurring, etc. This added up to a lot of steps in Javascript but fortunately there were a lot of useful tools and code samples that helped me out along the way.
One of the biggest fails for me was the filesize of large frame sequences. This was slowed down by it also just being a lot of HTTP requests as well, many frames were just blank just because of how I handled the overlays. This could’ve been made easier if I could display multiple videos on iPad, for instance, or if HTML allowed for a standard way of displaying video with an alpha channel. These of course were things that are Flash’s strong suit but of course that’s another story, haha.
Anyway, sometimes these constraints spur you to come up with creative solutions to issues. Overcoming these challenges can be the spice of life. For now, the next challenge awaits!